Skip to content

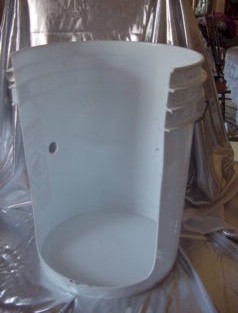
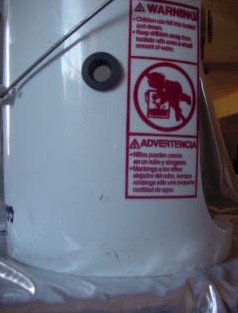
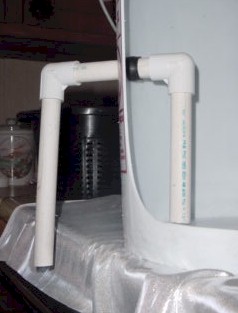
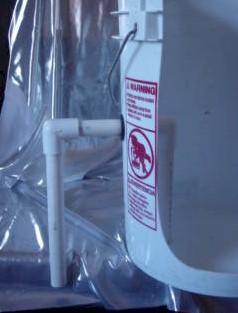
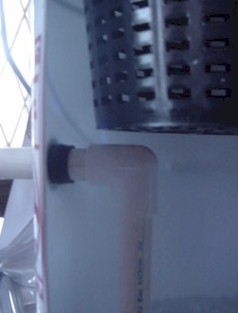
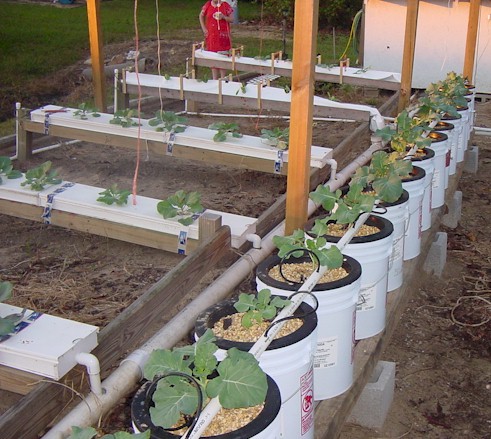
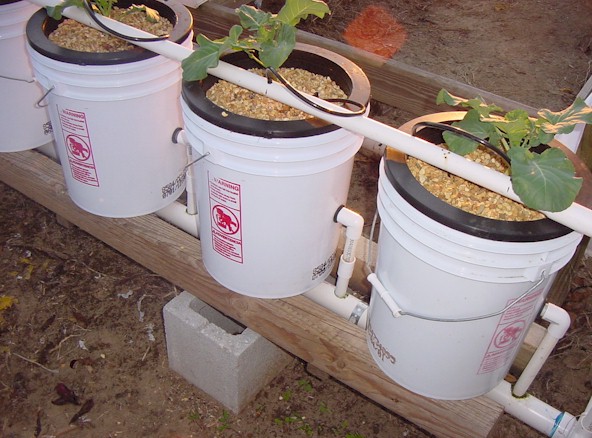
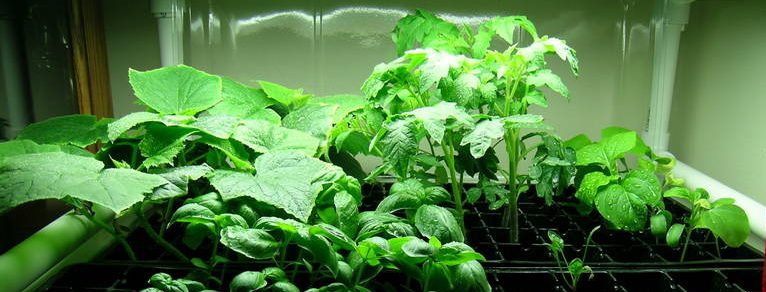
These originally appeared on a now-defunct hydroponics website, and show how the hydro gardener assembled Dutch pot -style hydro containers from 5-gallon buckets, PVC pipe, and 10" net pots. The grommet used is a 3/4", the drilled hole for it is 7/8" (rather than 13/16), allowing 3/4" PVC pipe to pass thru and seal snugly. The drilled hole should be positioned so that it will be about 1" below the bottom of the installed net pot. Chamfering the end of the PVC pipe and lubricating it with soapy water facilitated inserting the pipe through the grommet. The grommet shown is not the standard doughnut shape, but rather a T shape, with the insertion of the pipe expanding the inner side of the grommet to effect the seal. The inside end of the drain pipe should be cut at an angle to help prevent clogging. Note that the photos showing the buckets installed appear to have their drains cut and spliced to lengthen some of them, because the grade of the main drainpipe was not considered. The grow medium appears to be pea gravel, with nutrients fed via drip emitters from a main supply line. Note that it's a good idea, no matter where you place the emitter, that the connection to the supply line be over the bucket as well, in case of leaks.

Building this 30 plant site NFT system was challenging, and a lot of fun. Finding all the necessary components was the challenging part; putting it together and having it work was the fun.

Basically, it's three channels, or gulleys, fed by a submersible pump in a reservoir. Water is pumped up through a manifold which supplies the jet pipes in each gulley. Water flowing along the bottom of the gulleys and splashing on the net pots keeps the plant roots moist, nourished, and oxygenated.

Each gulley is a 4"x4"x6ft vinyl fence post jacket with caps for same glued and sealed onto each end. Holes are drilled for the plant sites, the drain, a drain access port, and a pass-through for the spray lines.

The reservoir itself supports the gulleys on one end, and a saw-horse type structure, the other. Holes are cut in the reservoir's lid for the gulley drains, the supply line from the pump, and an access port to check the water level and refill.

Other parts and fittings include:

  • Female hose bib to 1/2" compression elbows to attach 1/2" CPVC capped-end spray bars to the manifold
  • Plastic C clip brackets, bolts & nuts to attach spray bars to upper inside of gulleys
  • 3/4" PVC Ts and elbows to fabricate manifold (slip x slip x thread)
  • 3/4"NPT x male hose thread nipples to attach compression elbows to manifold
  • 1-1/4" x 9" plastic lavatory drain pipes for gulley drains
  • Various grommets for drain pipe and spray bar seals
  • 750 gph magnetic drive submersible pump
  • 3" net pots and hydroton expanded clay media

It would have been better to construct the unit using 5"x5" fence post jackets, but none were locally available. Using such would have allowed standard 4" diameter test plug caps to cover the drains, and would also have required the manifold to be constructed using 1" PVC fittings with 3/4" threaded outlets. I would also, in retrospect, have done better to pass the ends of the spray lines all the way through the other end cap, and terminate them with threaded caps, which would have allowed for easy cleaning with a long, thin tubing brush.

I decided to do a "No-Till" bed this fall. The no-till strategy is a great, lazy person's way to quickly establish a garden bed. All you need is the stuff you've saved-- or should have saved-- from mowing the lawn and trimming the bushes all summer. Yup, all that crap you set out at the curb for the trash man every week is exactly what you should have kept for one of the easiest and best gardening techniques ever devised.

Also known as sheet-mulching or sheet-composting-- the method is well covered in Patricia Lanza's book "Lasagna Gardening"-- it involves the preparation of a garden bed by layering different organic materials into a ready-to-plant growing medium. You can read the book, or just get a reasonably good idea of how it works from what I did.

...continue reading "Don’t Ask, Don’t Till"

Watering the plants-- you gotta do it, no matter what. No water, no garden. It would be nice if rainfall was predictable and regular enough to let nature handle things, but it just ain't always so. Garden irrigation can be a real pain-- if you water manually, you can't forget to do it, especially during the heat of summer. You don't want to under or over-water, and different plants have different requirements in order to do their best. One solution is to set up a low-volume or "drip" irrigation system. Using low-pressure tubing and dripper or sprayer heads, you can tailor your system to serve a variety of plants. Plants that need more can be supplied by adjustable drippers or spray heads; plants that need less can be supplied by fixed drippers that supply as little as one gallon per hour.

I found a lot of cool stuff by a manufacturer called Mr. Landscaper© that covers so many bases in low-volume irrigation, it's hard to fathom what else you could possibly need to handle your garden and plant watering needs.

I did find one thing, however, and it really completes the whole setup. It's the Orbit Sunmate Automatic Yard Watering System©. Although it's aimed at high-volume lawn use, it's wide range of operating pressures-- from 10 to 80psi-- allows its adaptation to low-volume irrigation quite nicely. ...continue reading "Where My Hose At?"

Feel bad every time you look in the refrigerator vegetable crisper bins and find stuff going to rot? There's a gardening bright side to this dilemma, and it's called vermi-composting.

What's that, you ask? It's actually nothing more than a fancy term for composting using worms. It's easy, and is probably one of the best things you can do for almost all your plants.

Worm castings, as they are called (conjuring up images of industrious little worms gracefully "casting" their... well... their "worm poo"), are one of the most nutrient-rich forms of organic fertilizer you can use. All you need is a dark-colored, covered-but-vented bin, some kitchen scraps, some moistened shredded up newspaper, and a pound or so of worms. ...continue reading "Worms Ate My Buick"

Not abandoning hydroponics by any means, I decided to try to go organic this season with a raised bed. I built mine 2 ft. by 12 ft. to go along the edge of a patio.

Construction, after a bit of design brainstorming, was fairly straightforward, and I was filling it up with soil in about an hour and a half.

I used 6'x5.5"x5/8" cedar fenceboards. Corners are pressure treated 12" 2x4s screwed perpendicular to 12" 2x6s. Bottoms of 2x6s have 3/8" holes drilled 5" deep into which 12" 3/8" re-bar is inserted. These will serve to stake the box to the ground. Due to the 12 ft. length, center supports made of 12" 2x6s, again with the re-bar, tie the 6 ft. sections together in the middle. There's some very minor bowing at the middle, so I may or may not add something across the top, front to back, to pull it in line. 1-1/4" galvanized screws attach ends of cedar boards to insides of corners and center connectors, 1" down from tops of corner pieces so another layer can be stacked on top later if desired. 6 mil plastic sheeting lines the inside walls, but not the bottom-- two layers of heavy cardboard are laid out in the bottom to shut out the grass.

The local organic nursery delivered a yard and a half of organic garden mix in a super sack. Really nice stuff, and with the surplus, I'll have enough to beef up the beds in front of the house and fill another 6x6 foot raised bed . Plus, I have the compost pile going since last summer, and a worm bin that puts out some really good stuff for fertilizer.

If you do a lot of gardening, you know how valuable compost can be towards enriching the soil and improving plants. Rich in organic material, compost acts as a soil conditioner and nutrient source, and also contains beneficial microbes that assist in making those nutrients more readily available to your plants.Commercially-available compost making units seemed rather costly to me, so I decided to build a one out of an old trash can. Holes had been worn in the bottom of the can over nearly two decades of use, but I figured it could continue to be of service in a different way.

All the necessary materials: One old 32-gallon RubberMaid trash can with lid, and a length of 4" diameter corrugated, perforated plastic drainage pipe (available from most home improvement centers). ...continue reading "Making A Composter"

My verticillium wilt-challenged creole tomatoes continue to soldier on in spite of their malady. Today, I counted 17 fruits set on the ever-expanding vines-- 18 if you count the one I knocked off by accident. Pulling down the shadecloth on that end of the greenhouse last week seems to have been a good idea.

I downloaded several winter kale recipes today in hopes of harvesting and consuming most of it before I turn my attention to a spring tomato crop-- one that does not include the apparently-resistant-to-nothing creoles. I may try Better Boy, Celebrity, plum, Roma, cherry or Sweet 100's. I plan to convert the 5-gallon containers from last summer to Dutch pots, which should comfortably house tomatoes, and perhaps some cucumbers, bell peppers and squash, all of which should hopefully do nicely on the same nutrient.

[January 31st: Make that 30 tomatoes.]
[February 8th: I stopped counting at 40.]
[February 12th: 51.]

My container garden project this spring would have gone a lot better except for two things. One, a weeklong period of hot sun with no rain really took a toll on the tomato plants, even though I set up a system to spray mist the foliage. Second, at some point, the critters started finding my plants-- I must have thrown out over a dozen affected tomatoes. Having my plants in a greenhouse would have-- or should have-- solved both of these problems. With the embarkation on my hydroponic system, I decided to construct a small greenhouse.

I found plans on the internet for a simple structure using PVC pipe to create a quonset hut-shaped "hoop house". Covered with 6 mil clear polyethylene film and strategically placed shade cloth, it should keep out critters, control temperature, and help retain moisture. ...continue reading "Greenhouse"

While researching a problem I was having with my container gardening project, I ran across something I found rather interesting-- hobbyist hydroponics. While I was familiar with the concept of growing plants without soil, I was not aware how many people grow vegetables, herbs, etc, successfully on a small scale.

I found that there are several techniques to grow hydroponically, and that-- compared to growing in soil-- the results are fantastic. For example, the time from planting tomato seedlings to harvesting vine-ripe mature fruits is significantly shortened-- from three months or more down to as little as eight weeks.

I decided to embark upon a new project, and build my own hydroponic system. I settled on a particular design that employed a hybrid concept to supply nutrients to the plants. ...continue reading "Hydroponics"