Skip to content

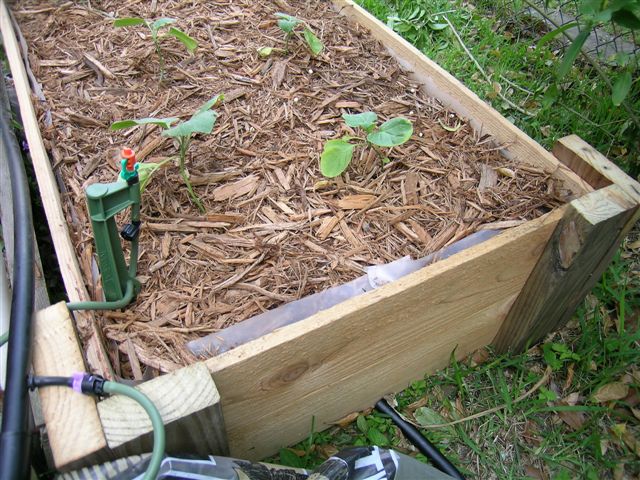
I decided to do a "No-Till" bed this fall. The no-till strategy is a great, lazy person's way to quickly establish a garden bed. All you need is the stuff you've saved-- or should have saved-- from mowing the lawn and trimming the bushes all summer. Yup, all that crap you set out at the curb for the trash man every week is exactly what you should have kept for one of the easiest and best gardening techniques ever devised.

Also known as sheet-mulching or sheet-composting-- the method is well covered in Patricia Lanza's book "Lasagna Gardening"-- it involves the preparation of a garden bed by layering different organic materials into a ready-to-plant growing medium. You can read the book, or just get a reasonably good idea of how it works from what I did.

...continue reading "Don’t Ask, Don’t Till"

Watering the plants-- you gotta do it, no matter what. No water, no garden. It would be nice if rainfall was predictable and regular enough to let nature handle things, but it just ain't always so. Garden irrigation can be a real pain-- if you water manually, you can't forget to do it, especially during the heat of summer. You don't want to under or over-water, and different plants have different requirements in order to do their best. One solution is to set up a low-volume or "drip" irrigation system. Using low-pressure tubing and dripper or sprayer heads, you can tailor your system to serve a variety of plants. Plants that need more can be supplied by adjustable drippers or spray heads; plants that need less can be supplied by fixed drippers that supply as little as one gallon per hour.

I found a lot of cool stuff by a manufacturer called Mr. Landscaper© that covers so many bases in low-volume irrigation, it's hard to fathom what else you could possibly need to handle your garden and plant watering needs.

I did find one thing, however, and it really completes the whole setup. It's the Orbit Sunmate Automatic Yard Watering System©. Although it's aimed at high-volume lawn use, it's wide range of operating pressures-- from 10 to 80psi-- allows its adaptation to low-volume irrigation quite nicely. ...continue reading "Where My Hose At?"

Not abandoning hydroponics by any means, I decided to try to go organic this season with a raised bed. I built mine 2 ft. by 12 ft. to go along the edge of a patio.

Construction, after a bit of design brainstorming, was fairly straightforward, and I was filling it up with soil in about an hour and a half.

I used 6'x5.5"x5/8" cedar fenceboards. Corners are pressure treated 12" 2x4s screwed perpendicular to 12" 2x6s. Bottoms of 2x6s have 3/8" holes drilled 5" deep into which 12" 3/8" re-bar is inserted. These will serve to stake the box to the ground. Due to the 12 ft. length, center supports made of 12" 2x6s, again with the re-bar, tie the 6 ft. sections together in the middle. There's some very minor bowing at the middle, so I may or may not add something across the top, front to back, to pull it in line. 1-1/4" galvanized screws attach ends of cedar boards to insides of corners and center connectors, 1" down from tops of corner pieces so another layer can be stacked on top later if desired. 6 mil plastic sheeting lines the inside walls, but not the bottom-- two layers of heavy cardboard are laid out in the bottom to shut out the grass.

The local organic nursery delivered a yard and a half of organic garden mix in a super sack. Really nice stuff, and with the surplus, I'll have enough to beef up the beds in front of the house and fill another 6x6 foot raised bed . Plus, I have the compost pile going since last summer, and a worm bin that puts out some really good stuff for fertilizer.

If you do a lot of gardening, you know how valuable compost can be towards enriching the soil and improving plants. Rich in organic material, compost acts as a soil conditioner and nutrient source, and also contains beneficial microbes that assist in making those nutrients more readily available to your plants.Commercially-available compost making units seemed rather costly to me, so I decided to build a one out of an old trash can. Holes had been worn in the bottom of the can over nearly two decades of use, but I figured it could continue to be of service in a different way.

All the necessary materials: One old 32-gallon RubberMaid trash can with lid, and a length of 4" diameter corrugated, perforated plastic drainage pipe (available from most home improvement centers). ...continue reading "Making A Composter"

My verticillium wilt-challenged creole tomatoes continue to soldier on in spite of their malady. Today, I counted 17 fruits set on the ever-expanding vines-- 18 if you count the one I knocked off by accident. Pulling down the shadecloth on that end of the greenhouse last week seems to have been a good idea.

I downloaded several winter kale recipes today in hopes of harvesting and consuming most of it before I turn my attention to a spring tomato crop-- one that does not include the apparently-resistant-to-nothing creoles. I may try Better Boy, Celebrity, plum, Roma, cherry or Sweet 100's. I plan to convert the 5-gallon containers from last summer to Dutch pots, which should comfortably house tomatoes, and perhaps some cucumbers, bell peppers and squash, all of which should hopefully do nicely on the same nutrient.

[January 31st: Make that 30 tomatoes.]
[February 8th: I stopped counting at 40.]
[February 12th: 51.]

My container garden project this spring would have gone a lot better except for two things. One, a weeklong period of hot sun with no rain really took a toll on the tomato plants, even though I set up a system to spray mist the foliage. Second, at some point, the critters started finding my plants-- I must have thrown out over a dozen affected tomatoes. Having my plants in a greenhouse would have-- or should have-- solved both of these problems. With the embarkation on my hydroponic system, I decided to construct a small greenhouse.

I found plans on the internet for a simple structure using PVC pipe to create a quonset hut-shaped "hoop house". Covered with 6 mil clear polyethylene film and strategically placed shade cloth, it should keep out critters, control temperature, and help retain moisture. ...continue reading "Greenhouse"

I came up with an idea to use a couple of 5-gallon plastic buckets to approximate an Earthbox-type planter. The buckets happen to stack with about 4 inches of space between the bottoms of the two. This space will serve as a water reservoir.

I cut a 3-1/2-inch hole in the bottom of one bucket, as well as 16 3/8" holes for soil aeration. A 16-ounce plastic Solo or Dixie cup placed in the hole serves as the "wick" for the potting mix to absorb water. Cutting slits in it allows the water to pass through.

The only mod to the lower/outer bucket was to drill a 3/8" hole in the side just below the bottom edge of the upper/inner bucket, to serve as an overflow and to allow air in. One of the 3/8" holes near the edge of the inner bucket was enlarged to accept a length of 1" rigid plastic aquarium tube for a water fill tube. I purchased a single bucket lid, in which I cut a 3" hole in the center for a single tomato plant, and also a 1" hole to accomodate the watering tube. Before putting the lid on, I spread about a cup of granular fertilizer in a thin ring around the outer edge of the surface of the potting mix. Then the lid was put on and the tomato plant was planted thru the center hole. Should be enough to sustain a single plant for an entire season.

Project cost: Buckets $2.50 (x2); lid $.97; 1"x18" tube $1.50; plastic cup free; 25 dry quarts potting mix $2.99; 1 cup dry fertilizer and 1 cup hydrated lime (to condition soil for tomatoes) ~ $.50. Total approx. $11.00.